hey guys, I had to replace my thermostat because of a reoccurring CEL. (P0128 coolant temperature is below the thermostat regulating temperature)
I decided to go ahead and take a few pictures while replacing it.
Overall its a very simple and to the point replacement. It can be a pain to access all 3 of the bolts that are holding the thermostat down. Its a little easier if you remove the hose that's connected to it, as well as a few pieces that create more space for your hands.
Tools/Parts needed: 12mm wrench 10mm wrench pliers flathead screwdriver bucket (to catch the coolant) Thermostat part # 19301-PNA-003
about to do this this weekend. for folks having a hard time visualize where the thermostat is:
STEP 1
Start car and turn the heat all the way up, then turn the car off.
STEP 2:
Jack up car
STEP 3:
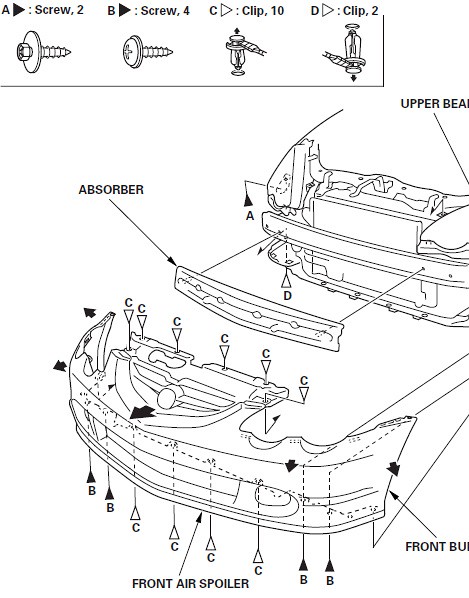
Remove bumper
STEP 4:
Remove lower splash shield
STEP 5:
Loosen the drain bolt and place the bucket under it. Take off the caps off the top of the radiator and reserve tank.
Remove the reserve tank drain plug and place a bucket under it.
STEP 6:
Use pliers to remove the metal clamp off the hose that connects the radiator to the thermostat. There is a clamp on each side of the hose. Go ahead and remove the hose to allow more work space. (be careful because a little bit of coolant will come out of the hose, so have a bucket ready)
STEP 7:
To allow more space for my hands I removed this metal/rubber bracket. It has 2 x 12mm bolts holding it in place. (circled in red) I also disconnected 2 wire clips from the metal mount (inside red square)
STEP 8
This step is where you need smaller hands.
I used a 10mm wrench to remove the 3 bolts. (Some more coolant dripped down while removing the last bolt.)
The hardest part about this is getting to the bolts, it only took one full turn to loosen the bolts so I could take them out the rest of the way with my fingers.
REINSTALL IN REVERSE ORDER. The only thing you might want to do is place the hose on the thermostat before reinstalling it.
WHEN REFILLING THE RADIATOR WITH COOLANT:
STEP 1 Make sure both plugs are securely placed back STEP 2 Refill coolant into radiator up to the base of the filler neck. STEP 3 Install the radiator cap loosely. STEP 4 Start the engine, and let it run until it warms up (keep the heat on full blast) (the radiator fan comes on at least twice). STEP 5 Turn off the engine. Check the level in the radiator and add more coolant if needed
IF YOU WANT TO TEST YOU THERMOSTAT BEFORE INSTALLING NEW ONE:
I did this yesterday and it basically went as described. Here are a few things I noticed:
(Step 3) You don't have to remove the front bumper. Maybe it makes access a little easier, but I had no trouble removing the splash shield with the bumper still in place.
(Step 5) The reserve tank drain plug is much higher than the radiator drain plug. I decided to syphon the coolant out of the reserve tank to avoid making a big mess (ironic considering what was about to happen).
(Step 6) Not much coolant came out of the hose that connects the radiator to the thermostat, maybe a few drops.
(Step 8) Reaching the thermostat bolts definitely the hardest part of the job. It sucked. As soon as the thermostat was loose, probably 3/4 cup of coolant poured out from behind it, judging from the mess on the floor :
(Reinstall) I put the hose on the thermostat afterward because it was a little easier to reach the bolts with the hose off.
(Refill Step 2) When refilling the radiator, don't fill it up to the top. As the coolant heats up and expands, it will overflow. In retrospect this is kind of obvious, but I learned my lesson the hard way. The floor was already a mess though...
(Refill step 4) Be sure to keep the heater on max heat during the bleeding process, since air is trapped in the heater as well. I forgot to do this and there were strange results.
(Refill) Don't forget to refill the radiator reserve tank. Of course, it doesn't do much unless the radiator cap is tightened/pressurized, so don't expect to see fluid movement during the bleeding process.
CAPACITIES SPECIFICATIONS
Subscribe
Sign up to get the latest on sales, new releases and more …